This post will outline and explain in great detail how to install Windows XP, reinstall, upgrade, perform recovery, repair Windows XP, restore and format Windows XP.
INTRODUCTION:
After reading countless posts and forums I was unable to find the answer, how to perform a clean install of Windows XP. So i decided to make my own post on what the steps are and the problems most of us face during the installation process. I hope the detailed steps will be use full to everyone.
WINDOWS XP INSTALLATION:
I always recommend a clean installation, regardless of which windows version
you intent to install. A clean installation will provide better stability and
increased performance can be expected when installed to a clean hard drive or
partition. This process will teach you not only how to install windows but will
provide you with basic computer knowledge so that you won’t ever have to take
your system to the computer shop.
- Back up Files & Drivers:
Always remember to back up your files and computer drivers before performing any kind of installation. To back up your drivers you can use the following 2 ways.
1.1) Batch File: I have provided a batch file that will backup your drivers and save them to your documents folder for Windows XP. But this batch file will not work for VISTA or WINDOWS 7.
1.2) Free DriverMax: For XP, Vista or Windows 7 consider Innovative Solution's free DriverMax. It is FREE but you still must register it if you wish to keep using it. Once installed and registered, it automatically backs up and restores drivers.
I recommend creating both driver backups as my batch file is not 100% reliable.
-
Installation Process:
a. 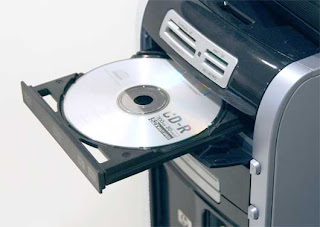
Insert the Windows XP cd in the cd-rom b. 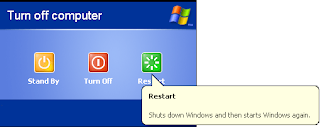
Restart your system. c. 
Bios Setup. To access your bios setup, during the boot up press the Key Commands needed to access the BIOS, this will be a text message usually at the bottom or top of the screen. If your system has a splash screen with the OEM logo hiding the boot up screen, press ESC as soon as you start boot up. d. 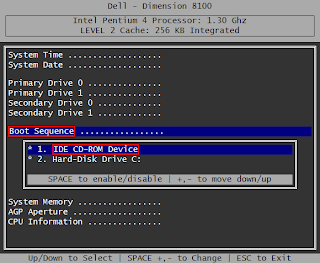
When you get to the BIOS, access the screen that allows you to change the boot sequence. Set it to boot from CD before hard drive in the boot sequence. e. 
Now your system will restart again and will show you the following screen. Follow the on screen instructions. f. 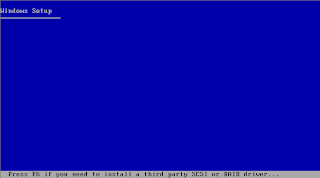
Now the windows installer setup process will copy the necessary files and programs that it needs to start. Wait for the process to finish. g. 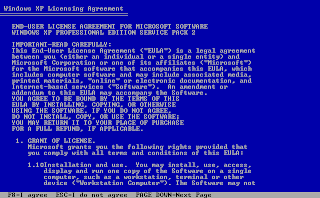
After the windows installer has copied all the files it requires it will display the Windows XP License Agreement. Hit F8 if you agree. h. 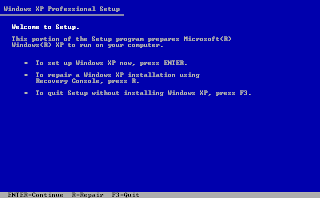
Now you will be shown the welcome screen. Hit ENTER.
i. 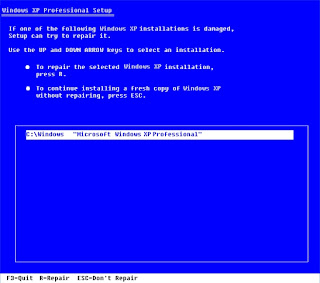
Now you will be shown if you have any previous windows versions installed, it will be displayed below and you have the choice to repair it. (PRESS “ESC” for a clean installation). j. 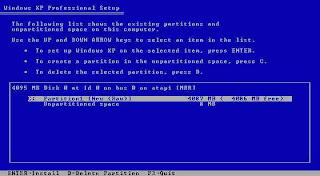
Now you are at the partition manager of Windows XP. Hit “D” to delete the exiting partition. k. 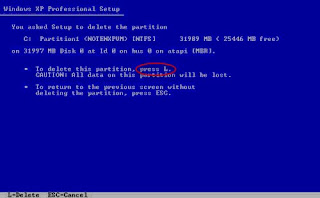
You will be shown a confirmation message. Hit “L” to continue. l. 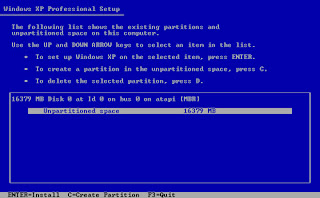
Now you will be taken back to the Partition manager. Here you will see the UN-partitioned space that previously was used by windows. Hit “C” to create a new partition. m. 
Now here you will enter the amount of GB (or more accurately the MB) that you will allocate to the C: Drive (where windows will be installed).
Windows XP, with all its updates and basic softwares installed, will take up approximately 10GB of your hard disk. So I always allocate 30.1GB for windows and the leftover space is allocated to the D: drive.
The calculation is as followsDrive C: = 30.1 x 1024
1GB = 1024MB
You can always increase the size that you want to allocate to the C drive. The formula remains the same. Just change the amount you wish to allocate to C and add 0.1 to it.(i.e. 50GB + 0.1 = 50.1GB)n. Now you will see that you have created a partition. If it is correct then hit ENTER to start installation or if you want to change the partition then hit D and then start from step “J”. o. 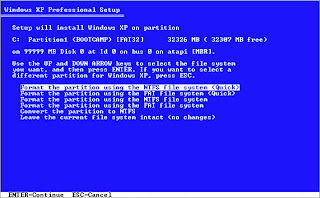
Now you will see the format options for the partition. Select First option “FORMAT THE PARTITION USING THE NTFS FILE SYSTEM (QUICK)”. Hit enter to continue. p. 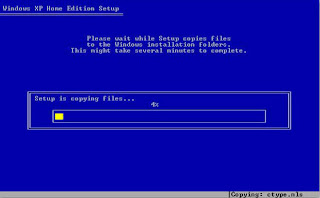
Once you hit ENTER the WINDOWS XP Installation process will begin. The setup will start to copy files to the hard disk that are necessary for the setup. q. 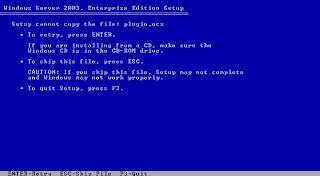
Here I would like to offer some advice about a common error that people encounter and don’t know why it happens. Sometimes the setup displays the following message.
This error might appear due to three hardware problems.
i. Ram is not functioning.
ii. Processor is not working properly
iii. Hard disk has bad sectors.There is also a forth reason but that is very rare. Make sure your WINDOWS XP CD is 100% correct. To check the CD, try the installation process on another system that you know does not have the above 3 issues. If the same error appears on that system as well then your WINDOWS XP CD is not correct. IF YOU DO NOT ENCOUNTER THIS ISSUE THEN SKIP THIS STEP.r. 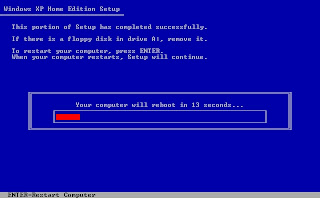
After the copy process has finished the SETUP process will prompt to restart the system. Let the system restart and setup will continue after the restart. 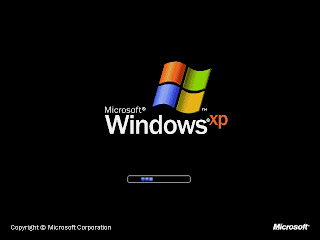
After the restart don’t touch the keyboard. The system will show the same screen mentioned in STEP “E”. Don’t press any key, and you will see the windows XP start up boot screen. s. 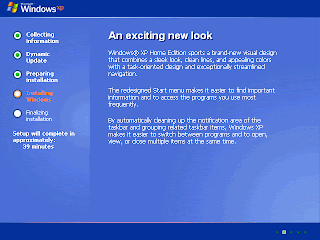
After the boot screen you will see the GUI of the WINDOWS XP SETUP. At this point there is no need to do anything and let the setup complete. The setup will take some time so you can carry on with other tasks. But keep checking from time to time because it will ask to enter location details, time and calendar settings, time zone, computer name, organization and WORKGROUP settings.
Once finished the system will restart automatically and again show the boot from cd option. Do not press any key and the WINDOWS BOOT up Screen will show again. At this point you can remove the CD from your system.t. 
Now you will see the welcome screen of WINDOWS XP. Press next to continue. u. 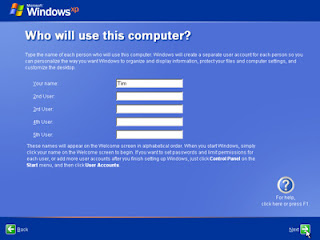
The setup will ask you to enter users. v. 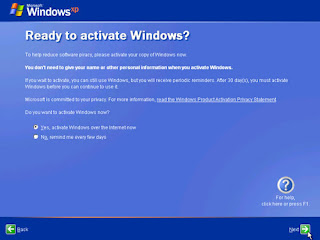
Then you will have to activate WINDOWS XP. 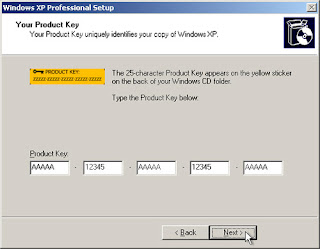
Enter the WINDOWS XP ACTIVATION KEY that can along with your WINDOWS XP INSTALLATION CD. w. 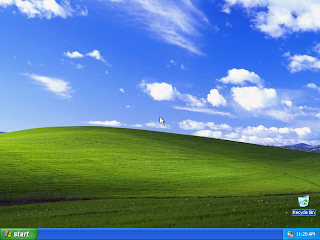
After you have provided the key the setup will finish and take you to the WINDOWS XP DESKTOP. x. 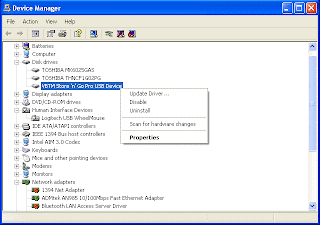
To install the backed up drivers go to the device manager and point each missing driver to the backup you made at the start of this tutorial.


For Batch File to back up drivers click here.
I hope the tutorial was helpful. Kindly leave your comments and/or any queries that you may have.
If you want to install XP, Vista or 7, or you want the driver backup batch file, just click on the relevant links below.
How to Install Windows Vista
How to Install Windows 7
How to Install Windows Vista
How to Install Windows 7
No comments:
Post a Comment